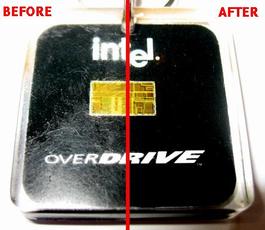
Lucite surface Before and After a restoration
When collecting vintage electronics and computer memorabilia, you're bound to come upon some items that are cased in Lucite or contain Plexiglass components. Both Lucite and Plexiglass are the brand names for a clear, durable acrylic material. Other brand names for Acrylic include Plexiglas and Polycast. Over the years the words Acrylic and Lucite have become synonymous.
The popularity of this plastic material came from the fact that it is durable, strong, and transparent; it can also be easily bound together using adhesive cement. While acrylic looks like glass, it is stronger and about half the weight. Acrylic is also crystal clear, however it is not as scratch resistant as glass is.
Most Clear Plastic Keychains, Awards and Paperweights with embedded items in them are made from Lucite, though a rare few may be made from glass.
Perhaps the one downside, from a collector's point of view, is that It can develop scratches over time, dulling the appearance of a component and diminishing its condition. Often, Lucite Keychains become heavily scratched from actual use on a keyring, and paperweights will get scratched from being moved around on the desktop. Your Acrylic items may also be scratched due to neglect from bad cleaning habits in the past (using dirty cleaning cloths, using chemicals or abrasive pads).
Luckily, there are a few great strategies for removing scratches and improving the general appearance of Lucite components - Lucite is the easiest plastic to polish so most items can be restored back to there original beauty & brilliance with just a little work.
Before we start, some key points...
What not to do:
- Do not use Windex or other regular home cleaners on any Lucite surfaces. This can cause an adverse reaction on the surface of the material, causing little lines and fractures to form crazing. There is nothing you can do to repair this, so take this piece of advice seriously.
- Avoid subjecting any Lucite materials to high heat, which can cause the surface to become cloudy and unattractive. This includes hot water! Beware of washing any Lucite material in anything warmer than lukewarm water.
- Never use a textured sponge or anything other than a soft clean cloth to clean Lucite. Any textured surface will scratch up the Lucite in the process.
Safety First: Always wear safety glasses when buffing. Work in a well ventilated area. Always hold work securely & firmly when using any type of powered buffing wheel.
Polishing Cloths: The type of polishing cloth you use will make a difference. The ideal cloth is nonabrasive, absorbent and lint free. To eliminate any chance of scratching, use only disposable cloths. Reusable cloths can retain abrasive particles, but you won't know for sure until the damage is done. Use a soft cotton cloth (such as a diaper), avoid using polyester or rayon wipes which can scratch unprotected plastics.
Flame Polishing: (heating Acrylics with a torch flame to smooth edges) We DO NOT recommend "Flame Polishing" your Acrylic items since they should not have any rough cut edges coming from the manufacturer. "Flame polishing" will more than likely melt and damage your Acrylic items!
Power Buffer: If the damaged area is fairly large or badly worn, a power buffer (hand-held Dremel Tool or a Drill motor with a Polishing wheel attached) may be used with the Polishing paste (NOVUS No. 2 and No. 3. for example). Use a clean cotton or felt polishing wheel and operate the buffer at on a low speed to avoid overheating the plastic, approximately 1,000 RPM. Each polish should be applied with a separate, clean polishing wheel. Use minimum pressure when buffing. Let your buffing wheel and compounds do the work. If your buffing wheel slows down, you are pressing too hard. To much pressure can cause deformations from heat. DO NOT Over-Buff an item when polishing. Buffing for too long a period or with excessive pressure can heat up and then deform and/or burn the plastic.
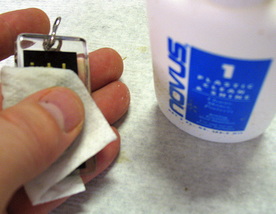
Before Polishing: Before attempting to clean or remove scratches, always make sure the plastic is cool to the touch. Use a liberal amount of plastic cleaner to safely remove surface dust and dirt. In addition, test scratch removers in a small or inconspicuous area for compatibility. DO NOT use abrasive cleaners (like Ajax or Comet), household cleaners, window-cleaning fluids (like 409 or Fantastik), scouring or "Brillo" pads, gritty or dirty cloths, or strong solvents (like alcohol, acetone, carbon tetrachloride, etc.). These will all cause micro scratches and will dull or haze your acrylic items.
Coated, Lettered, Labeled Items: Some items may have plastics that are coated with a thin film, have desirable labels, or have printed enamel lettering all of which which will be damaged by use of sandpaper or the abrasives in some polishes. NOVUS No. 2 and No. 3 & any other abrasive type Polishes or sandpaper are not recommended for use on items with these conditions unless suitable masking is performed to protect the desired areas first.
Disclaimer: ChipsEtc.com is not responsible for any personal injury or damages that may occur to items from use of this information or from use of any products we are recommending - use at your own risk. Always proceed with patience & caution, know what type of plastic you are working with, and Always practice with a spare piece of acrylic or a low value item first to develop your technique before starting restoration on a valued item. It is up to you to determine the risk versus reward of restoring your rare and/or valuable collectible items. Some items may be best left in there current condition due to rarity and/or value if restoration carries a risk of damaging the item or lowering its value. If you are not sure if restoration should be done on an item then simply DO NOT DO IT - consult a professional restorer.
